


If there was a word that best described the agency life, it would undoubtedly be “chaotic.” Whether you’re dealing with demanding clients, trying to keep up with ever-changing projects, or juggling multiple creative teams, the fast-paced (and often unpredictable) nature of agency life is sure to keep you on your toes.
Though some creatives thrive in the chaos, most agency professionals just want to find a way to bring order to this madness. That’s where agency project management tools come into play.
Now, the market for these tools is quite saturated. However, few tools have such a massive market share (14.20%) as ClickUp.
With over 100,000 paying customers, ClickUp is obviously a fan favorite among users. But what about agencies? Is ClickUp the right choice for agencies in general, as well as your particular agency?
Keep reading to learn everything you need to know about ClickUp for agencies, getting answers to any of your burning questions in the process.
What Is ClickUp?
Before delving into the specifics, we must first answer the most basic of all the questions: What is ClickUp?
Now, if you were to ask ClickUp developers this question, they would probably answer with the platform’s tagline – “One app to replace them all.” But this incredibly ambitious platform is actually a cloud-based collaboration and project management tool.
Like Bonsai, ClickUp is committed to transcending the boundaries of traditional project management tools by adding numerous features that make everyday agency life substantially easier. Some of these “additional” tools include the following:
- Native chat
- Custom user permissions
- Calendar and timelines management
- Advanced customizations
ClickUp for agencies: The most helpful features
There’s no doubt about it – ClickUp is incredibly feature-packed. But not all of these features will be useful to your agency. So, let’s break down only the most helpful features ClickUp has in store for agencies.
Centralized dashboards
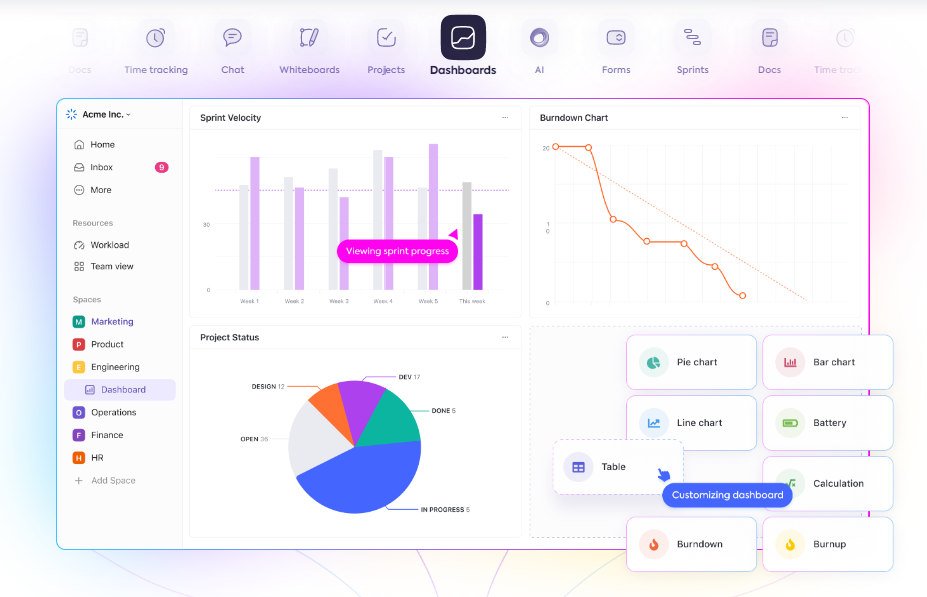
A dashboard is a crucial feature for agency leadership and project managers, regardless of the size or type of the agency. This handy feature consolidates key metrics and project insights into a single, accessible interface.
ClickUp excels in this area, as it allows you to create a dashboard from scratch and customize it to your agency needs using cards as primary building blocks. Of course, if you’re new to project management, you can also use dashboard templates to quickly set up a comprehensive overview.
Checklists
Technically, checklists are a part of the ClickUp hierarchy. They’re the final hierarchy level you can build into a task. However, it’s worth mentioning them as a separate feature because they are integral to streamlining task execution and enhancing organization within the agency.
You see, when your team members often repeat a task on a daily or weekly basis, they tend to start focusing on the bigger steps while skipping the small ones. However, every step, no matter how small or big, is essential to the overall success or quality of the task. That’s where checklists come into play. Think of them as step-by-step to-do lists that ensure no details are overlooked when performing a task.
Time tracking
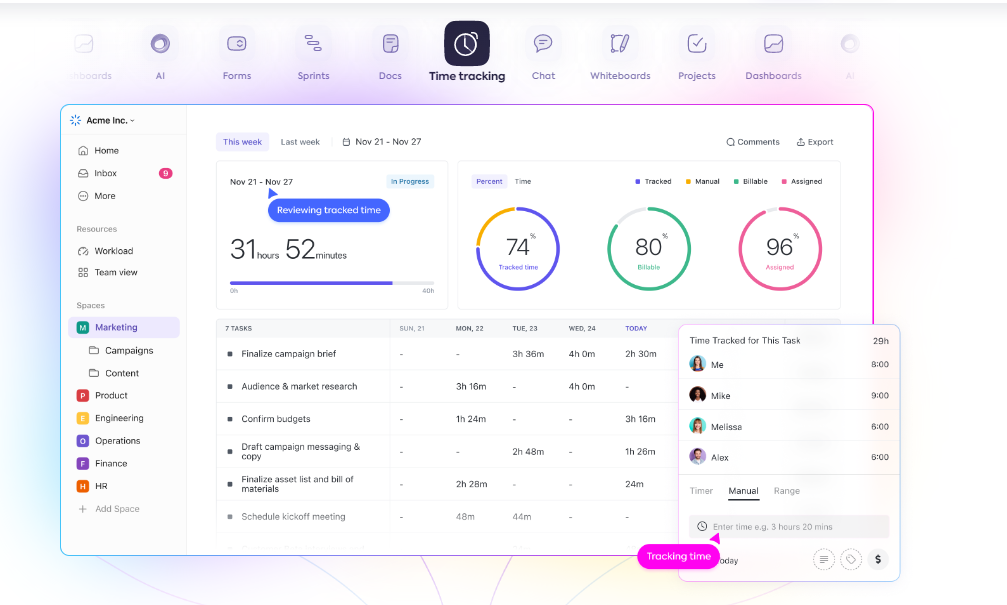
As most agency owners will tell you, getting the creative team to track their time accurately can be a real challenge in agency work.
That’s why the best business management platforms like Bonsai and ClickUp offer robust features to tackle this issue and ensure accurate time tracking (and billing) for agencies.
With ClickUp, you can add a time tracker to virtually any level of the ClickUp hierarchy (e.g., Space or Folder), thus allowing for granular time tracking. You can even categorize the tracked hours as “billable” and “non-billable.” Input a billable rate for the former, and ClickUp will even calculate the total revenue generated for that specific project.
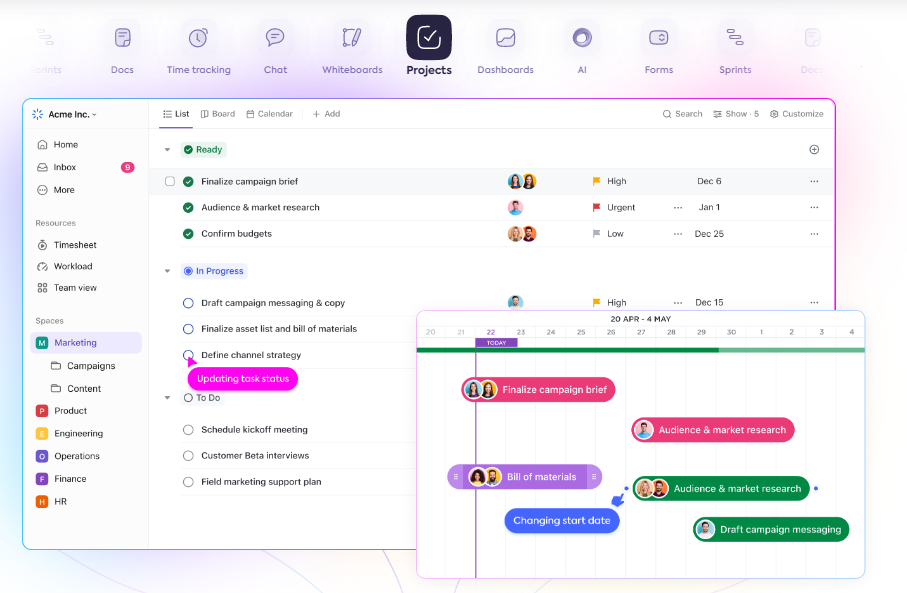
Views
Views are undoubtedly one of ClickUp’s most powerful features. The same applies to ClickUp for agencies.
With views, you can gain unparalleled control over how everyone within your agency visualizes and interacts with its tasks and projects. By everyone, we’re referring to the following categories:
- Leadership
- Project managers
- Account managers
- Individual team members
- Clients
Each of these categories requires a different level of visibility and information presentation tailored to their specific roles and responsibilities. ClickUp allows you to create just that – customized views that cater to the unique needs of each category within your agency.
For instance, you can create a “My Tasks” view that will tell individual team members what’s on their agenda for the day, week, or month. Or, you can create a Gantt view that will allow project managers to organize due dates effectively.
Task status
With ClickUp’s task statuses, you’ll always know the current state of all agency projects, allowing for clear communication and effective progress tracking. Best of all? You can create custom task statuses if the default ones don’t fit your needs.
So, you might use the typical “to-do,” “in progress,” and “complete” statuses, but you can also add tailored statuses that work for your agency, such as “ideation,” “drafting,” or “testing.”
Whichever route you take, make sure every team member is familiar with the meaning of every task status to avoid miscommunication.
Integrations
No matter how rich in features, most agency tools and software, including Bonsai, offer integrations to enhance their functionality. ClickUp is no different.
ClickUp allows you to integrate with over 1,000 tools and apps and constantly expands this list. But again, you surely won’t need all of these integrations. If you go overboard, you risk making your workflow more complex rather than streamlined, which is why you’re using ClickUp in the first place.
Here are some integration options to consider when using ClickUp for agencies:
- Slack
- HubSpot
- Google Drive
- QuickBooks
Templates
As mentioned, templates can be a lifesaver for new agency owners. But even if you have experience with running an agency or a team, these handy features can help you save time, maintain consistency, and streamline processes.
Good news – you’ll have no shortage of templates with ClickUp.
As you spend some time using the platform, you’ll also be able to create custom templates that fit your agency’s needs and make daily operations significantly easier.
Best of all? Custom templates can be as detailed as you’d like to ensure nothing gets lost in the shuffle of daily operations. Add task descriptions, checklists, time estimates, custom fields, and due dates to each template to create a powerful asset in project planning and execution.
How to use ClickUp for agencies
Now that you know what ClickUp brings to the table let’s get you started with using this versatile project management platform. This step-by-step guide will walk you through the most crucial elements of customizing ClickUp for your agency.
Step 1 – Set up a workspace
The workspace is the highest level in ClickUp’s hierarchy. With this in mind, it’s only logical to start your ClickUp journey by creating one for your agency.
This step is quite straightforward – just sign up for ClickUp, and you’ll receive a default (empty) workspace. Name it after your agency, and you’re good to go. Of course, it’s the customizations done afterward that will make this workspace truly tailored to your agency’s needs.
Step 2 – Choose the best pricing plan
Signing up for ClickUp is free. What’s more, you can continue using the platform for free, provided you run a small agency. But, of course, all the advanced ClickUp features and capabilities are reserved for the paid plans. So, if you’re serious about unlocking the full potential of ClickUp (and your agency), this is the way to go.
When it comes to paid plans in ClickUp, there are three options to choose from. All of them are above the average cost of project management software. Here’s a quick overview of all three pricing options:
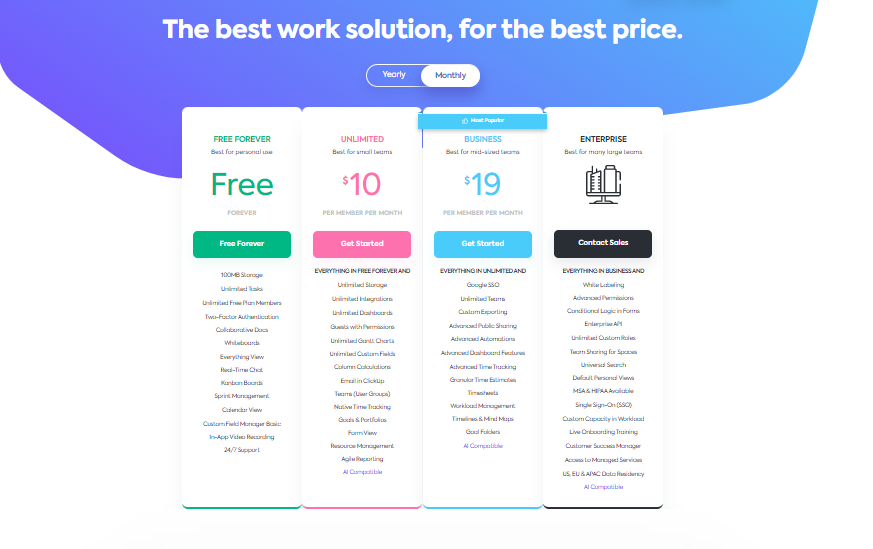
- Unlimited: $10 per user per month (billed monthly) or $7 per user per month (billed annually)
- Business: $19 per user per month (billed monthly) or $12 per user per month (billed annually)
- Enterprise: custom pricing
Step 3 – Customize your account
Step 3 is where your agency’s ClickUp workspace starts looking like a well-tailored solution for its needs. During this step, you can customize options like the following:
- Visual preferences (e.g., light or dark mode)
- Notifications (e.g., email notifications)
- Profile customizations (e.g., profile picture and dashboard colors)
Step 4 – Invite the implementation team
At this point, it’s time to introduce functionality into your ClickUp workspace. You’ll hardly be able to do so yourself, so now is the perfect time to invite the implementation team to join you in ClickUp. Be careful about only inviting the implementation team, as bringing all employees in this early in the process can only cause chaos. And remember – we’re trying to tame the chaos using ClickUp!
Step 5 – Enable specific ClickApps
Unlike all-in-one business management tools like Bonsai, ClickUp doesn’t come with automatically built-in functionalities. Instead, you’ll have to enable the ones you need to make them a part of your workspace. These functionalities are called ClickApps, and they are what transform your workspace from a blank canvas to a powerful agency management tool.
Here are some ClickApps you should consider enabling from the start:
- Automation – automating manual and repetitive tasks
- Custom fields – customizing your workspace
- Email – sending and receiving emails in ClickUp
- Priority – organizing tasks based on their priority
- Pulse – tracking the team’s progress in real-time
Step 6 – Build the ClickUp hierarchy
As you’ll soon see, the ClickUp hierarchy is one of the biggest advantages of using ClickUp compared to its alternatives. The ClickUp hierarchy is relatively easy to set up yet transformative to how every member of your agency approaches and manages tasks and projects.
Here’s a brief overview of this helpful hierarchy:
- Workspace. You’ve already created this hierarchy level in Step 1.
- Spaces. Spaces represent different departments, teams, or areas of focus within your agency (e.g., creative, marketing, and operations).
- Folders. With folders, you can group similar work together, broken down into lists and tasks.
- Lists. Use lists to break down work into more specific categories or stages.
- Tasks. Tasks represent the specific actions that need to be completed and can be categorized into parent tasks and subtasks.
- Checklists. As mentioned, checklists serve to jog the memory of your team when completing complex tasks with multiple steps.
How to implement ClickUp for agencies
After setting up your ClickUp workspace, there’s nothing left to do but start using the platform within your agency. However, this also requires following a carefully curated set of steps to avoid overwhelming your team and ensuring a smooth transition. Keep in mind that most of these steps aren’t exclusive to ClickUp and can be used with other management tools of your choice, such as Bonsai.
Step 1 – Train your team
Let’s not sugarcoat it – ClickUp has quite a steep learning curve. This primarily has to do with the platform’s unique approach to project management. So, you can’t simply invite your team members to ClickUp and expect them to start using it overnight. You must train them first.
During this process, your team members should learn the following:
- How to use the basic and advanced functionalities within the platform
- Ground rules regarding project management as a whole
- Standardized rules and procedures for your agency
- The agency’s expectations regarding the ClickUp use
Step 2 – Build a launch plan
Before officially implementing ClickUp in your agency, you should ensure you’ve laid all the groundwork properly. A launch plan should help you achieve this. This plan can start with training your team and end with a launch party. Between these two points, you should take care of all the little details that can contribute to a smooth onboarding process, such as creating templates, choosing integrations, and configuring your active work in ClickUp.
Step 3 – Promote effective use
Even after ClickUp has officially been launched in your agency, you’re still not in the clear. No matter how well-trained they are, some team members might struggle to adjust to a new platform and even protest its use.
That’s why it’s crucial to use the immediate post-launch period to promote effective ClickUp use. This can involve the following:
- Giving direct feedback on areas of improvement
- Creating consistent yet easy-to-follow norms
- Documenting everything so team members have no issue finding relevant information
- Leading by example by modeling the perfect ClickUp discipline and usage

Step 4 – Arrange one-on-one meetings with team members
Within the first few weeks of implementing ClickUp, your team members will benefit from one-on-one meetings designed to assess their use of the tool and correct any mistakes early on. These meetings will help your employees feel supported and clarify any uncertainties they might have about using ClickUp.
However, they’ll also help you identify areas of improvement and potentially introduce new rules and procedures or tweak the existing ones.
The pros and cons of using ClickUp for agencies
By now, you probably understand how ClickUp works and how to implement it in your agency. This means this guide has only one more question to tackle: Should you implement ClickUp for your agency? To answer this question, we’ll look into the advantages and disadvantages of using ClickUp for agencies.
Seeing where this platform shines and where it falls short will help you make an informed decision about whether ClickUp is the way to go for your agency.
The pros of using ClickUp for agencies
ClickUp excels in specific areas of agency work. Here are the characteristics (and features) that make this happen.
Hierarchical task organization
Few project management tools boast such a flexible and logical hierarchical organization as ClickUp. This characteristic is a major plus, given the importance of a well-thought-out agency hierarchy. When built correctly, ClickUp’s hierarchy offers clarity to each individual within your agency, from the leadership to the external contributors.
Customizable views
With ClickUp, each member of your agency will only see information relevant to their role and responsibilities. This eliminates unnecessary clutter and confusion, creates a focused work environment, and even safeguards against any leaks of confidential information within the agency.
Best of all? Your team members can further personalize their views (or dashboards) to tailor them to their individual preferences (e.g., using color-coded labels for specific tasks).
Overall flexibility and adaptability
As you’ve probably noticed by now, ClickUp’s flexibility is its strongest suit. Whether it’s custom fields, workflows, or views, you’ll always be able to adapt ClickUp to create an ideal solution for your agency.
The cons of using ClickUp for agencies
ClickUp is undoubtedly feature-rich. Surprisingly, however, the platform still lacks some rather basic features necessary for successfully running an agency. The lack of these features is also considered ClickUp’s biggest disadvantage.
No client portal
There is no built-in client portal in ClickUp like there is in Bonsai. To be fair, you can create a separate client-facing space to serve as this portal, but this requires extra work. This process also includes setting up automation to determine which tasks get copied and become visible to clients. So, making mistakes and potentially exposing confidential information that the client was never supposed to see is easy.
No CRM
An effective CRM (customer relationship management) tool is crucial to running an agency successfully. Unfortunately, ClickUp offers no built-in CRM capabilities. Again, you can create a dedicated CRM space in your workspace, but you’ll be forced to build it almost from scratch instead of simply accessing a well-built native tool.

No referral tracking
Growing an agency is no easy task. One of the ways to speed up this lengthy process is by using referrals from your existing clients. Sometimes, you’ll receive these referrals for free, but other times, you might need to motivate your clients to give referrals through discounts or similar rewards. However, regardless of your approach to referrals, you won’t be able to track these using ClickUp.
No form builder
A custom form builder is an incredibly useful feature for any agency to have. With this feature, you’ll save time, capture accurate information, and maintain consistency in data collection. But you won’t be able to do any of these things with ClickUp, as the platform doesn’t offer a form builder.
No invoicing
As your agency grows, issuing invoices manually will become a waste of time. Instead, you’ll need a software tool that can issue invoices automatically every time a trigger is activated (e.g., after paying for a service on your website). Sadly, no such option exists in ClickUp, forcing you to look for third-party integration or a separate invoicing tool.
In contrast, Bonsai offers built-in invoicing capabilities to help you close the deal with every client.
When to use ClickUp for agencies
So, what is the final verdict when it comes to using ClickUp for agencies? It’s simple – use this tool if you want to primarily focus on project management and build your workspace virtually from scratch. However, if you’re looking for an all-in-one business management platform or an easier-to-use platform that comes “pre-made,” a tool like Bonsai will be a better option.


'%3e%3cg id='Final-Copy-2_2_' transform='translate(1275.000000, 200.000000)'%3e%3cpath class='st0' d='M7.4,12.8h6.8l3.1-11.6H7.4C4.2,1.2,1.6,3.8,1.6,7S4.2,12.8,7.4,12.8z'/%3e%3c/g%3e%3c/g%3e%3c/g%3e%3cg id='final---dec.11-2020'%3e%3cg id='_x30_208-our-toggle' transform='translate(-1275.000000, -200.000000)'%3e%3cg id='Final-Copy-2' transform='translate(1275.000000, 200.000000)'%3e%3cpath class='st1' d='M22.6,0H7.4c-3.9,0-7,3.1-7,7s3.1,7,7,7h15.2c3.9,0,7-3.1,7-7S26.4,0,22.6,0z M1.6,7c0-3.2,2.6-5.8,5.8-5.8 h9.9l-3.1,11.6H7.4C4.2,12.8,1.6,10.2,1.6,7z'/%3e%3cpath id='x' class='st2' d='M24.6,4c0.2,0.2,0.2,0.6,0,0.8l0,0L22.5,7l2.2,2.2c0.2,0.2,0.2,0.6,0,0.8c-0.2,0.2-0.6,0.2-0.8,0 l0,0l-2.2-2.2L19.5,10c-0.2,0.2-0.6,0.2-0.8,0c-0.2-0.2-0.2-0.6,0-0.8l0,0L20.8,7l-2.2-2.2c-0.2-0.2-0.2-0.6,0-0.8 c0.2-0.2,0.6-0.2,0.8,0l0,0l2.2,2.2L23.8,4C24,3.8,24.4,3.8,24.6,4z'/%3e%3cpath id='y' class='st3' d='M12.7,4.1c0.2,0.2,0.3,0.6,0.1,0.8l0,0L8.6,9.8C8.5,9.9,8.4,10,8.3,10c-0.2,0.1-0.5,0.1-0.7-0.1l0,0 L5.4,7.7c-0.2-0.2-0.2-0.6,0-0.8c0.2-0.2,0.6-0.2,0.8,0l0,0L8,8.6l3.8-4.5C12,3.9,12.4,3.9,12.7,4.1z'/%3e%3c/g%3e%3c/g%3e%3c/g%3e%3c/g%3e%3c/svg%3e)